Airsoft Loadout Guide: How to Build the Perfect Gear Setup for Every Playstyle in 2026
Your Loadout Is More Than a Shopping List
You probably already have a decent AEG and a pair of goggles, but once you step onto the field, things get complicated fast. Magazines stuffed in pockets are impossible to grab mid-firefight, your water bottle is sitting back in the safe zone, and two games in you realize your vest is turning you into a walking sauna. You bought plenty of gear, but the way it’s put together just isn’t working.
That’s what building an airsoft loadout is really about — not just listing what to buy, but figuring out how everything works together so you can perform your best on the field. The same magazines, the same pouches, mounted in different positions on different carrying systems, can feel completely different in practice.
Related reading: If you’re still shopping for individual gear pieces, check out our Complete Airsoft Gear Guide first. This guide focuses on how to combine those pieces into a cohesive system.
Tactical Carrying Systems: Plate Carrier, Chest Rig, or Battle Belt?
Choosing your carrying system is the first step in building any loadout. It determines how much you can carry, how you carry it, and how freely you can move on the field. The three most popular systems in airsoft each have distinct strengths, and understanding the differences is key to making the right choice.
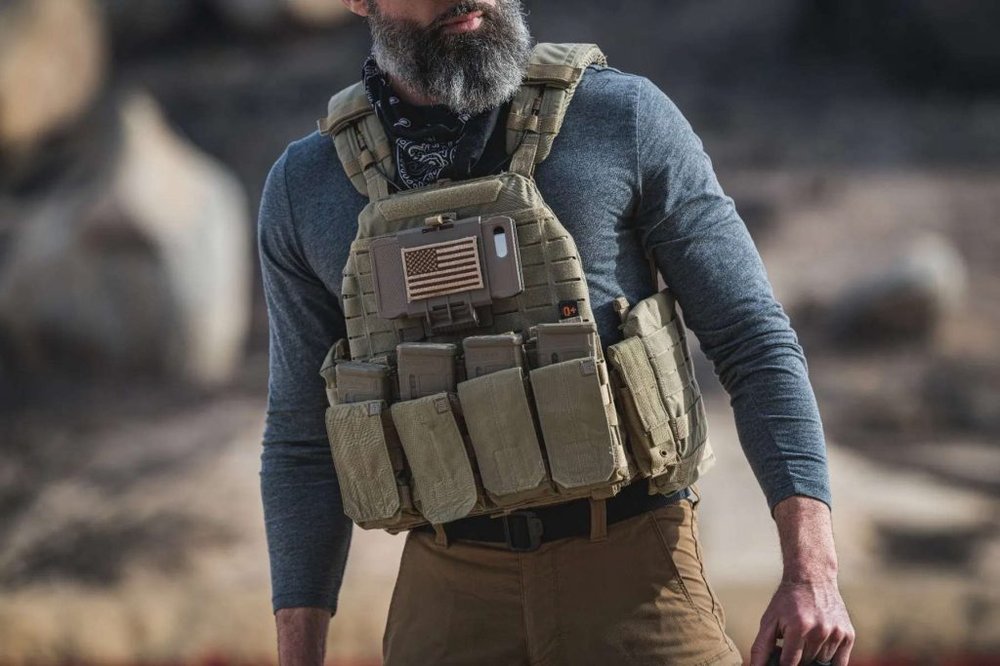
A plate carrier is the most common and instantly recognizable option. Originally designed as a military body armor platform, in airsoft we skip the ballistic plates but keep the MOLLE webbing and generous mounting space. Wearing a plate carrier feels “complete” — front and back panels both offer MOLLE real estate, and the shoulder straps plus cummerbund distribute weight across your entire torso. Entry-level options like the Condor MOPC or Emerson JPC run about $40-80, while mid-range JPC 2.0 replicas sit around $80-150. The upside is massive carrying capacity and that tactical look. The downside is equally clear: even without plates, the weight and coverage area will have you drenched in sweat on hot days, and your shoulders will start to ache after hours of wear.
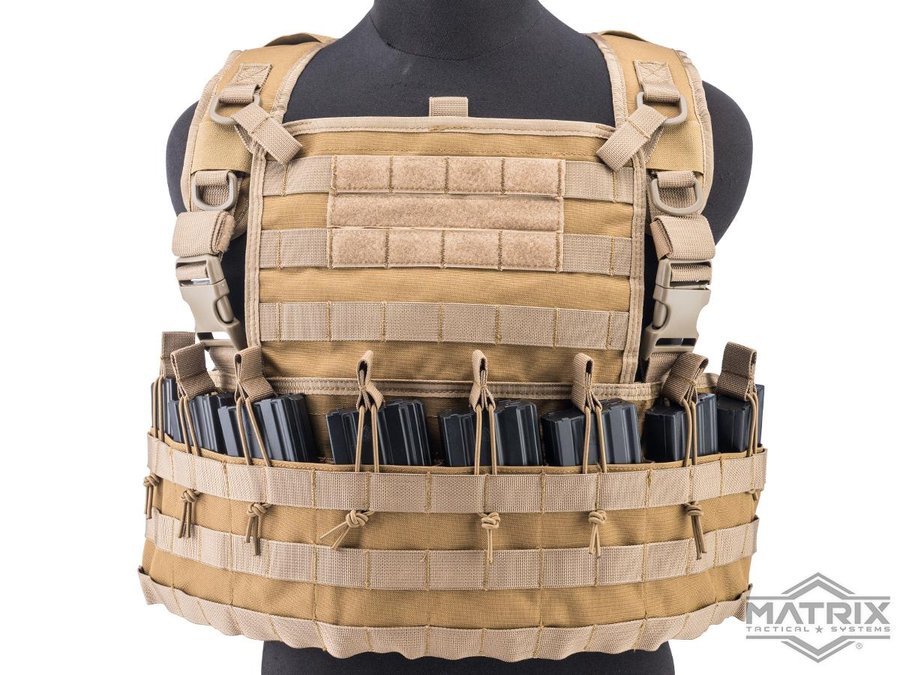
A chest rig has been gaining serious popularity in recent years, especially in warmer climates. At its core, a chest rig is simply a gear panel that hangs across your chest, typically with mounting space only on the front and your back completely exposed. This means dramatically better ventilation than a plate carrier and significantly less weight. Something like the Condor Recon Chest Rig runs about $50, while Spiritus Micro Fight clones can be had for $30-60. Wearing a chest rig feels more like having a few extra pockets strapped to your chest rather than wearing a vest. If you’re the type of player who hates feeling “trapped” by gear, a chest rig will feel much more freeing. The trade-off is limited carrying capacity — you’ll typically fit three to four rifle magazines and not much else.
A battle belt can be used standalone or paired with either of the above systems. It’s a rigid belt with a MOLLE attachment system, with all gear mounted at your waist. Running a battle belt solo is the lightest possible configuration — nothing on your chest, zero restrictions on breathing or movement. You can mount a pistol holster, one or two magazine pouches, and a dump pouch, which is plenty for pistol-only or light loadout players. However, if you need to carry rifle magazines, belt space gets tight quickly. Many experienced players run a “chest rig + battle belt” combination — rifle mags on the chest, pistol and utilities on the belt — which strikes an excellent balance between weight and functionality.
How to choose? A simple rule of thumb: if your field runs hot or you’re playing outdoors in warm weather, prioritize ventilation and go with a chest rig or battle belt. If you enjoy the military aesthetic of MilSim or need to carry large amounts of gear, go with a plate carrier. If you’re chasing pure speed like in Speedsoft, you might skip a carrying system entirely and rely on a belt or even just pockets.
Loadout Configurations for Four Playstyles
Each playstyle demands a fundamentally different approach to gear. The same gun and the same player, with a different loadout, might as well be playing a different game. Here’s how to think about gear configuration for the four most common playstyles.
Casual / Outdoor Loadout
This is the everyday setup for most airsoft players. You show up for a walk-on game day, play three to four hours, and need a setup that’s comfortable, functional, and won’t make you want to ditch all your gear at halftime.
A chest rig or lightweight plate carrier works best as your carrying system here. If summers in your area are brutal, a chest rig is practically the only sane choice. For magazines, three to four rifle mags on your rig (plus one in the gun makes four to five total) is more than enough for casual games — you can resupply during breaks. If you carry a sidearm, add a belt-mounted holster and one spare pistol mag.
Don’t forget water. This sounds basic, but you’d be surprised how many people play an hour before realizing they left their water bottle behind. If your plate carrier has rear MOLLE, mount a hydration carrier there. With a chest rig, a belt-mounted water bottle pouch works fine. Also strongly recommend a dump pouch — tossing spent magazines into it is infinitely faster than trying to stuff them back into mag pouches during a firefight.
For clothing, you don’t need full camo — focus on durability and protection. Long sleeves and pants reduce the sting of BB hits on bare skin, and boots with ankle support are essential on uneven outdoor terrain. Gloves are highly recommended too — taking a BB to the fingers is genuinely painful.
CQB Indoor Loadout
CQB is the fastest-paced scenario in airsoft, and the core principle for your gear is one word: light. You’re weaving through narrow corridors, snapping around corners, and constantly flowing between rooms. Any excess gear will slow you down or, worse, snag on a doorframe at the worst possible moment.
A micro chest rig or belt-only setup is ideal. CQB rounds are short and resupply is easy, so you don’t need many magazines. Two to three rifle mags plus one in the gun is plenty. If you’re running a Hi-CAPA pistol, three to four mags on your belt will keep you well-supplied.
Short-barreled AEGs and SMG-style guns have a natural advantage in CQB. M4 CQB variants, MP5s, and the ARP9 are all dramatically easier to handle around corners and through doorways than a full-length rifle. Going pistol-only is also a perfectly viable CQB strategy — without the added length of a rifle, your maneuverability indoors goes through the roof.
For protection, CQB means close-range hits that sting more. Full-seal goggles plus a lower face mask is the bare minimum, and many players also wear knee pads. Not for looks — kneeling shots and quick drops to the ground are constant in CQB, and doing that on concrete without pads gets old fast.
Related reading: Want to dive deeper into CQB tactics? Check out our Complete CQB Tactics Guide.
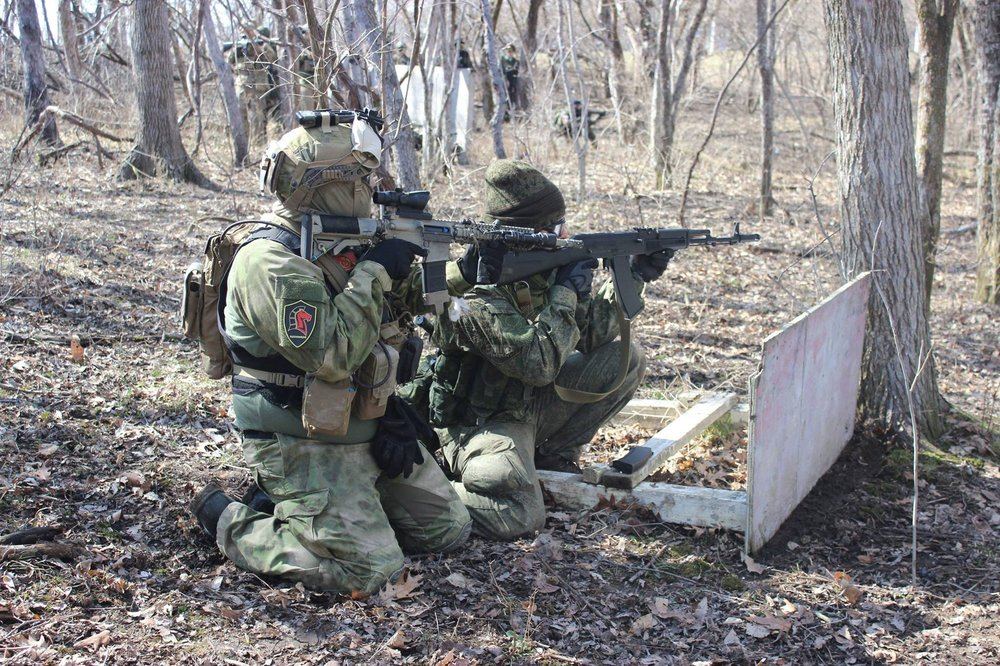
MilSim Loadout
MilSim (Military Simulation) is the playstyle that emphasizes realism and immersion above all else. A MilSim event can last 12 to 48 hours, and you’ll need to carry not just combat gear but survival supplies as well. This is by far the most gear-intensive playstyle.
A plate carrier is almost always the right choice, and specifically a higher-capacity model. MilSim events typically don’t allow mid-game resupply runs to the safe zone, so everything comes with you. You’re looking at six to eight rifle magazines minimum, two to three spare pistol mags, a hydration bladder (at least 1.5 liters), rations, a simulated medical kit, map and compass, and communications gear. Some MilSim events even require carrying mock medical supplies for simulated casualty evacuation procedures.
Communications equipment isn’t optional in MilSim — it’s essential. A two-way radio with a tactical headset or throat mic is your team’s lifeline. Mount the radio on your plate carrier’s front panel or shoulder strap for easy access, and position the PTT (Push-to-Talk) button on your chest where you can reach it instinctively. The Baofeng UV-5R is the go-to entry-level radio in the MilSim community — affordable and functional enough for most events.
Clothing typically follows faction-specific requirements. One side usually wears MultiCam (or similar modern multi-terrain patterns) while the other wears OD Green or Russian camo patterns. Always check dress code requirements before an event — wearing the wrong camo can lead to friendly fire incidents.
Weight distribution deserves special attention with MilSim loadouts. All your gear combined might exceed 10 kg (22 lbs), and if that weight concentrates on one side or one area, your body will protest within hours. Keep the heaviest items (hydration bladder, magazines) close to your body’s center, and use your plate carrier’s cummerbund to transfer some weight to your hips. Do a trial run at home — wear your full loadout and walk around for 30 minutes to identify any friction points or discomfort.
Speedsoft Loadout
If MilSim is a loaded long-distance march, Speedsoft is a 100-meter sprint. Everything exists to make you faster, and anything that doesn’t serve that goal is dead weight.
Carrying system choices are extreme. Many Speedsoft players don’t even wear a chest rig — they rely on hoodie pockets or a simple magazine belt to get by. If they do use a carrying system, it’s the lightest possible micro chest rig or a speed rig with nothing but mag slots. Less gear on your body means a smaller profile and harder to hit.
For weapons, Hi-CAPA GBB pistols reign supreme in Speedsoft. A properly upgraded Hi-CAPA with a short-stroke kit and lightweight slide, combined with raw trigger finger speed, can match AEG fire rates. Other popular choices include the AAP-01 (excellent value for beginners) and HPA-converted short M4s.
Speedsoft protection gear differs from every other playstyle. Paintball-style full-face masks (like the Dye i4 or i5) are the standard — they provide full face protection with better visibility and breathability than a goggles-plus-mesh-mask combo, and they’re lighter and more streamlined. Knee pads are near-essential since sliding is a core Speedsoft technique. As for clothing, athletic hoodies, shorts with knee pads, and indoor court shoes are the standard uniform — looking more like a paintball player than a military enthusiast.
Related reading: For more on Speedsoft rules, techniques, and gear, see our Complete Speedsoft Beginner’s Guide.
Accessory Planning: The Gear Beyond Magazines
A well-rounded loadout isn’t just about guns and mags. Those seemingly minor accessories often make the biggest difference in your on-field experience.
A dump pouch is, in my opinion, the single most underrated airsoft accessory. During a firefight, you can’t carefully slide an empty magazine back into its pouch — you just need to toss it somewhere and keep shooting. A foldable dump pouch sits flat when empty and opens up when you need it. They run $10-20 and solve a problem you didn’t know you had until you’re standing there with an empty mag in each hand and nowhere to put them.
An admin pouch sits on the upper front of your plate carrier and holds your phone, map, spare batteries, or field rules card. Not everyone needs one, but if you’re playing MilSim or like having your phone accessible for photos, a small admin pouch is incredibly practical.
A hydration system is practically mandatory for any session longer than an hour. A belt-mounted water bottle works, but a hydration bladder with a drinking tube lets you hydrate without stopping — particularly important in MilSim scenarios. Most plate carriers have a built-in hydration bladder compartment on the back panel, so look for this feature when shopping.
Finally, a word on MOLLE configuration logic. Don’t mount everything on your front panel — too much weight pulls you forward and makes going prone uncomfortable. Put your most-used items (magazines, dump pouch) in the most accessible positions, and less-used items (hydration, admin pouch) on the sides or back. Once configured, practice magazine changes and gear access at home several times to make sure everything is reachable without fumbling.
Budget Planning: Three Tiers of Complete Loadouts
Regardless of your budget, you can assemble a functional loadout. The key is spending money where it matters most — eye protection and footwear are absolutely non-negotiable, while everything else can start budget-friendly and upgrade later as you learn what you actually need.
An entry-level loadout runs about $150-250 (not including your gun). This gets you a Condor-tier chest rig or entry plate carrier ($40-60), three to four magazine pouches ($20-30), a dump pouch ($10-15), basic tactical boots ($50-80), goggles and face protection ($30-50), and gloves ($15-20). This setup is perfectly adequate for comfortable all-day walk-on games.
A mid-range loadout runs $300-500. Upgrade to a JPC-style plate carrier or modular Spiritus-style chest rig ($80-120), quality MOLLE mag pouches ($40-60), a battle belt system ($40-60), waterproof tactical boots ($80-120), anti-fog goggles plus lower face mesh ($50-80), and a hydration carrier ($20-30). This tier handles most scenarios, including entry-level MilSim events.
An advanced loadout runs $500+. At this level, you’re chasing specific brands and fine-tuned modularity. Genuine or high-quality Crye JPC 2.0 replicas ($150-300), Esstac KYWI magazine pouches ($20-30 each), a Ronin or AWS tactical belt ($80-150), Merrell or Salomon tactical boots ($120-180), and a communications setup ($60-100). Advanced players often maintain multiple loadout modules — swapping magazine pouch configurations on the same belt and carrier to quickly switch between playstyles.
Using a Shot Timer to Optimize Your Loadout
Your loadout isn’t just about aesthetics — what matters most is whether your gear actually works smoothly in action. And the best tool for measuring operational efficiency is a shot timer.
Use a shot timer to benchmark key actions across different configurations. For example, magazine changes — is it faster pulling a mag from your chest rig’s front panel or from your battle belt? Does moving your mag pouches from left to right make a difference? These questions get definitive answers after a few timed reps.
Some actions worth benchmarking include: rifle magazine changes (time from pulling a fresh mag off your rig to the first shot after reloading), pistol transitions (time from downing your rifle to drawing and firing your pistol), and accessory access smoothness (grabbing your water bottle, retrieving items from your admin pouch). If any action feels clunky, the issue might be pouch placement, retention tension, or items interfering with each other.
A good loadout doesn’t make you “think” about where things are — your hands just know. This takes time to develop, but deliberate practice with a shot timer dramatically accelerates the process.
Related reading: Learn more about shot timer training methods in our Shot Timer App Guide and Shooting Drills Guide.
Wrapping Up
Building an airsoft loadout is an ongoing process of adjustment and refinement. Your first setup doesn’t need to be perfect — what matters is getting out on the field and discovering what works and what doesn’t through actual play. Even experienced players are constantly tweaking their loadouts — one more mag pouch or one fewer, dump pouch on the left or right, tighten this strap just a bit more.
The best loadout is always the one that works best for you. Other people’s configurations are great for reference, but there’s no need to copy them exactly. Your body type, your usual field type, your playstyle, and your budget all combine to determine what configuration serves you best. Start with a simple chest rig and a few mag pouches, experiment and upgrade gradually — that process of discovery is part of what makes airsoft so enjoyable.
Related Articles
- Complete Airsoft Gear Guide - Detailed buying advice for every gear category
- CQB Close Quarters Battle Guide - CQB tactics and gear configuration
- Speedsoft Beginner’s Guide - Speedsoft gear and techniques
- Airsoft Beginner’s Complete Guide - Everything you need to know to get started
- Airsoft & Firearms Cross-Training Guide - Using airsoft gear for shooting practice
- Shot Timer App Guide - Improve training efficiency with a shot timer
- Airsoft
- Airsoft Loadout
- Airsoft Kit
- Plate Carrier
- Chest Rig
- Battle Belt
- MilSim
- CQB
- Speedsoft
- Tactical Gear
- MOLLE
- Airsoft Vest